
The Persistent Menu is the pinned button bar under a Messenger conversation (prices, delivery, talk to an agent, catalog…). Customers open it anytime without typing. Configure it from Persistent Menu Settings inside Bot Manager — Facebook/Messenger only (Instagram does not use this menu the same way).
Sidebar path: Facebook Tools → Bot Manager. Select the Page, then open Persistent Menu Settings → Change Settings. Before you can create the menu, Get started button status must be Enabled (full walkthrough: Get Started Template).
Before you start (prerequisites)
- Sidebar: Integrations → Connect Accounts. Confirm the Page appears under Page list and turn on Enable Bot Connection. Details: Connect Facebook and enable the bot.
- Meta requires Get Started enabled before creating a Persistent Menu. On Get Started Settings, set Get started button status to Enabled, then Save. If it is disabled, Create Persistent Menu stays disabled with a red warning. Full guide: Set Up the Facebook Get Started Template.
- Prepare 3–5 short labels (Meta allows roughly 30 characters per menu title) and decide each action from the type dropdown: Web URL (opens a link) or Post back (triggers a reply template) — items are not limited to web links.
- Prefer a clean Page such as صفحة اختبار for the first test; use production after verification.
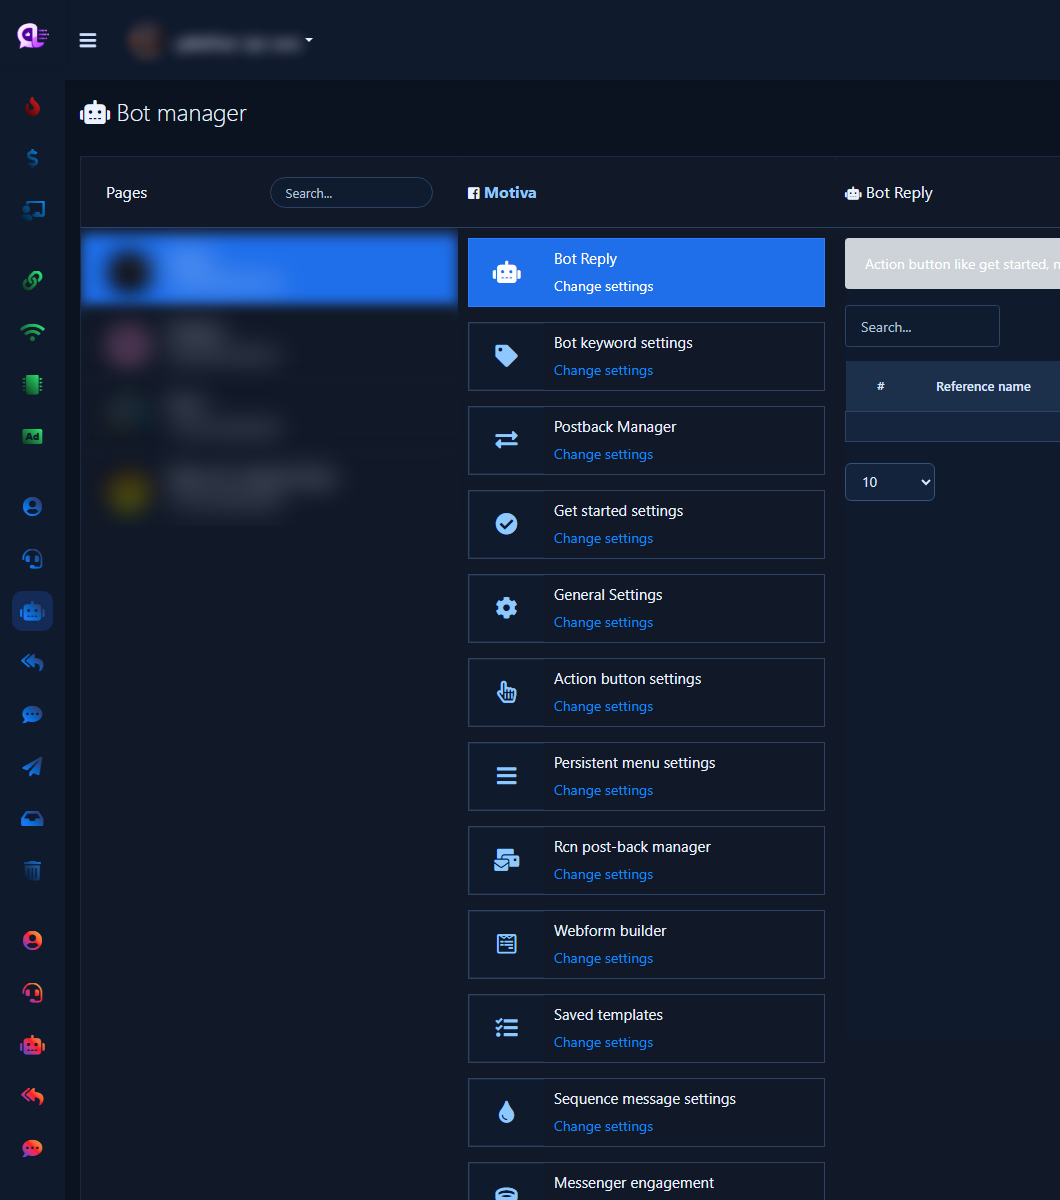
1) Open Bot Manager and select the Page
- Sidebar: Facebook Tools → Bot Manager.
- Select the Facebook Page and wait for the settings cards to load.
- You will see Persistent Menu Settings next to Get Started Settings and Action Button Settings. Confirm the correct Page — menus are per Page.
2) Open Persistent Menu Settings
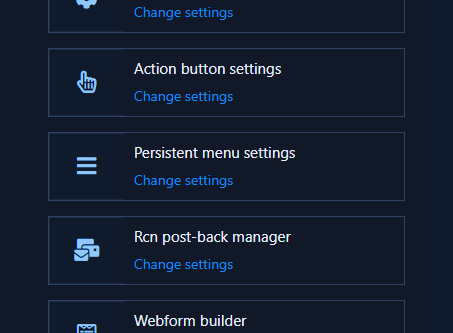
This is the menu entry point — not the Get Started panel. Click Change Settings on the Persistent Menu Settings card.
- In the settings cards column, find Persistent menu settings (hamburger / menu icon).
- Click Change settings to open the Persistent Menu list screen.
- If a red warning about Get Started appears: enable Get started button status = Enabled (see prerequisites), then reopen this card.
3) Persistent Menu list screen
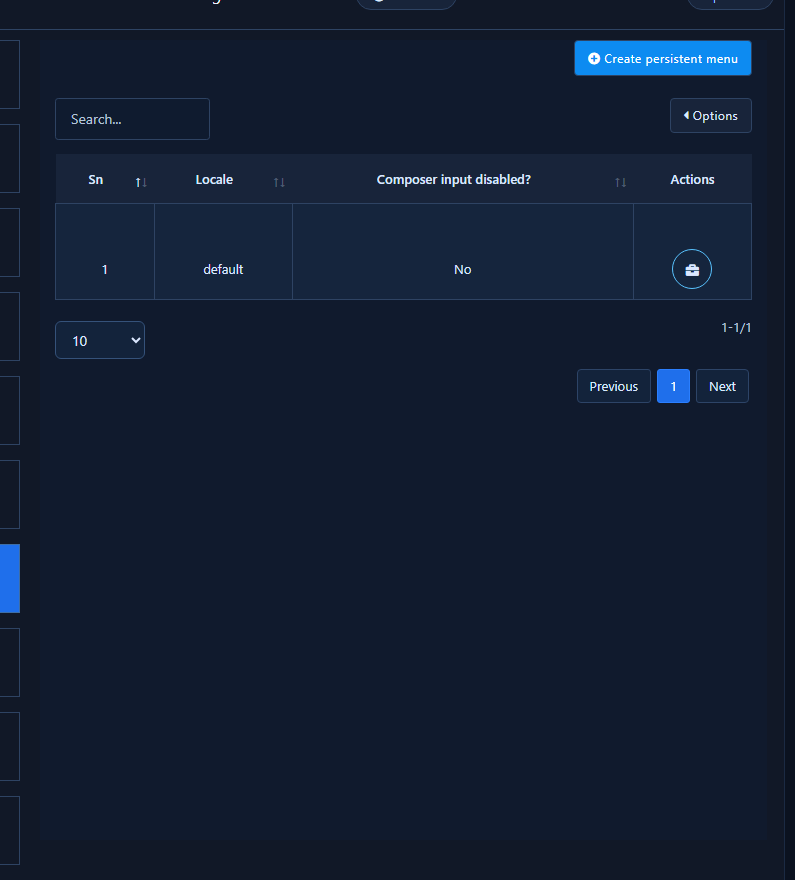
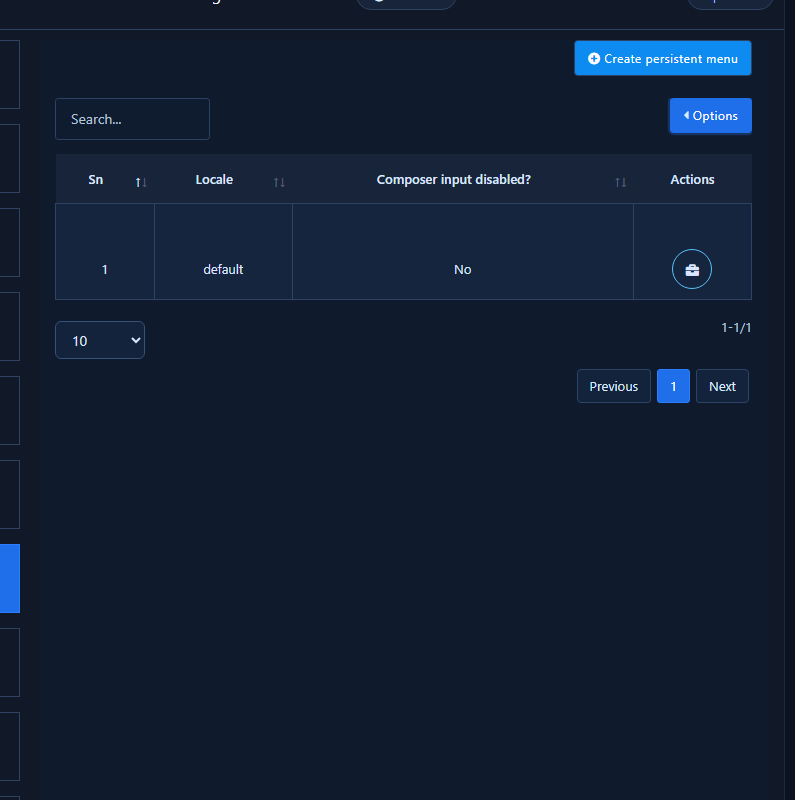
- You will see a blue Create Persistent Menu / Create persistent menu button and a table with SN, Locale, Composer Input Disabled?, and Actions.
- A row with Locale =
defaultis required before publish. System alert: “menu settings for default locale is mandatory.”
4) Build menu items (title + action type)
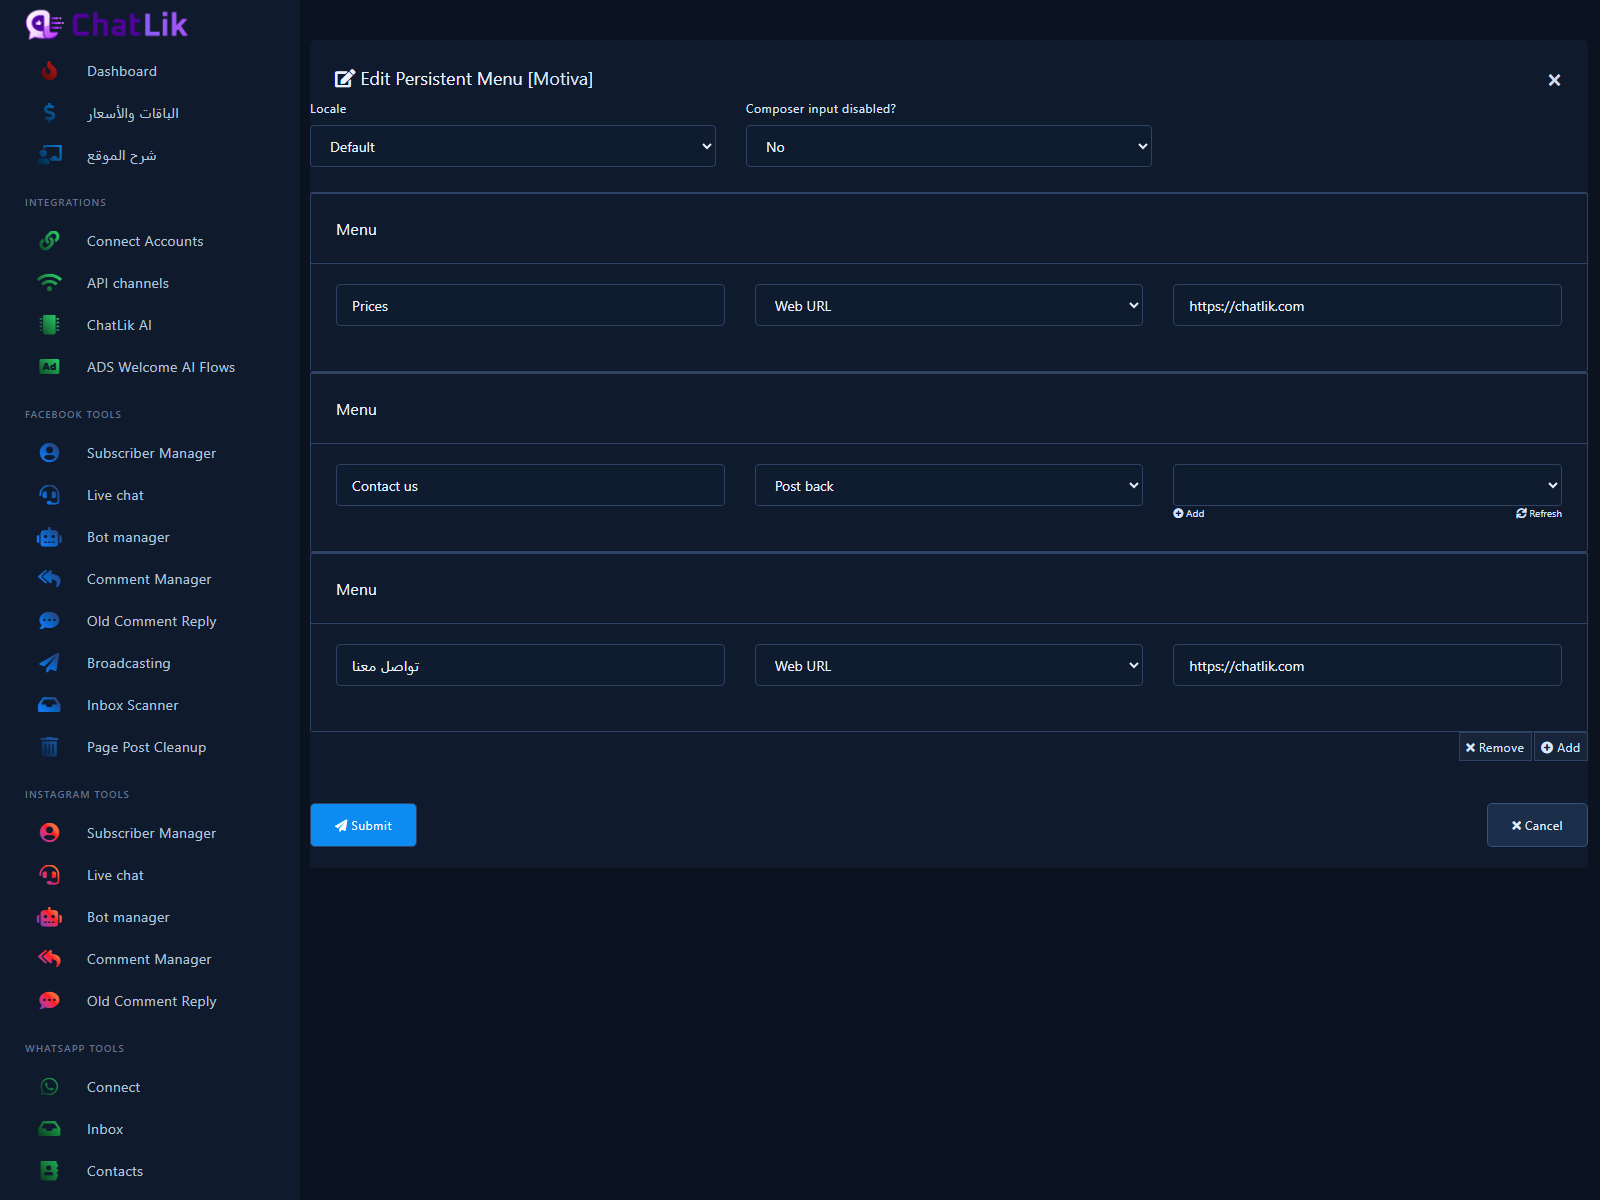
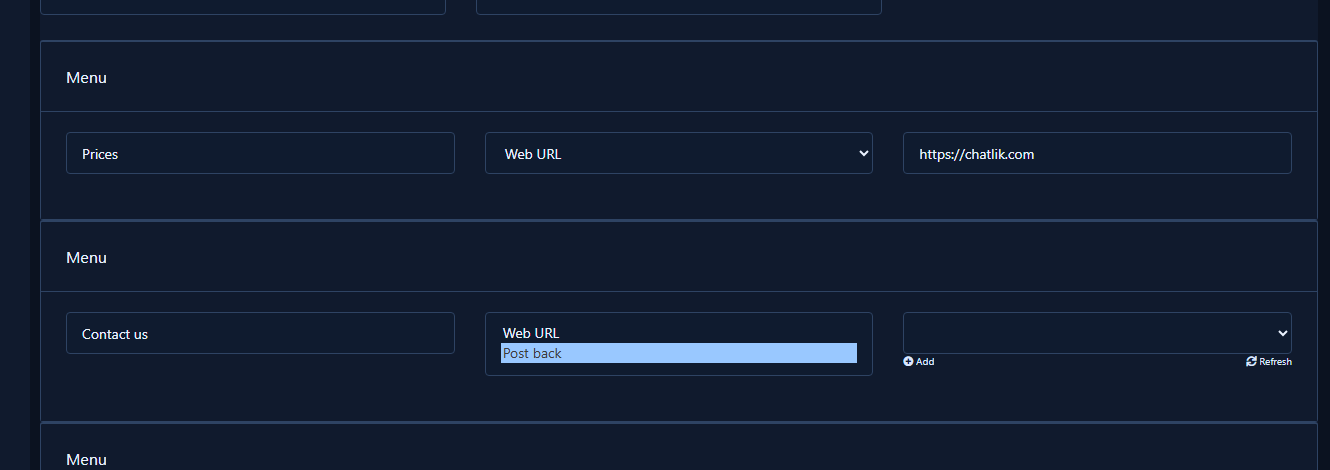
Use Create Persistent Menu (or Actions → Edit Persistent Menu if a locale row already exists) to open the item form titled Edit Persistent Menu.
- At the top: Locale — keep
defaultfor the primary menu (you can add locales such asen_USlater if needed). - Composer Input Disabled?: Yes hides the typing box and leaves only the menu; No keeps typing available (typical for support chats).
- For each Menu card, enter menu title (customer-facing label, ≤ 30 characters).
- Two action types in the middle dropdown — pick one per item:
- Web URL: opens an https link; the URL field appears next to the type.
- Post back (Post Back): sends a reply template in-chat; a template picker appears with Add and Refresh — items do not have to be web links.
- For Web URL, enter a full https URL. For Post back, pick a template; use Add to create one or Refresh after creating it.
- Add appends another top-level item — prefer 3–5 clear items (Prices as Web URL, Contact us as Post back…).
- Click Submit to save inside ChatLik, or Cancel to leave. Saving here does not publish to Messenger — publish is a separate step.
5) Publish to Messenger (required)
- Return to the Persistent Menu list screen.
- From Options next to the search box, choose Publish Persistent Menu.
- Wait for success: “persistent menu has been published successfully.”
- To remove later from Facebook/Messenger: same menu → Remove Persistent Menu (confirm the warning).
6) Test in Messenger
- Open a chat with the Page from a test account (real phone preferred).
- Find the menu icon / bar under the composer.
- Tap each item: confirm the Web URL opens or the Post back template arrives in the thread.
- If the menu looks stale: close and reopen the thread, or delete the thread and retry after republishing.
Practical tips
- Mix types: a URL for prices/site, and Post back for “Talk to an agent” or a services reply.
- Put a practical first item: “Prices” or “Talk to an agent”.
- After the menu, configure Facebook No Match and enable the switch in General Settings.
- For the full bot checklist see Messenger bot how-to.
- Do not mix this path with Instagram tools — Persistent Menu here is Messenger-only.
Common mistakes
- Leaving Get started button status on Disabled then trying to create.
- Clicking Submit without Publish Persistent Menu — the menu stays in ChatLik only.
- Publishing without a
defaultlocale row. - Titles over 30 characters or incomplete URLs (missing https) on a Web URL item.
- Choosing Post back without a mapped template.
- Assuming every item must be a web link — Post back is a first-class option in the same dropdown.
- Editing one Page while customers message another.
Related: Get Started · Ice breakers · Bot checklist · No Match · Connect accounts.


